Urban sketching is about capturing everyday life in hand-drawn stories. It relies on the artist's eye and the tools to bring the scene and experience to life. In this post, we’ll explore the practical tips and best tools for when you're sketching outdoors.
-
Drawing principles: Drawing outside can feel intimidating. Start by focusing on simple shapes. Break buildings, streets, and objects into basic shapes like rectangles, circles, and triangles before adding details. Pay attention to proportion and perspective, rather than thinking about perfection. Lightly mark in heights and widths by holding your pencil at arm’s length to measure relative sizes and angles before drawing them. Finally, draw what you actually see, not what you think should be there. Spending a moment observing angles, spacing, and negative space before you start will help you produce a more believable sketch.
-
Fineline pens: Perfect for permanently capturing the structure and character of urban scenes. They work well for details like windows, rooftops, street furniture, and people. Get a few waterproof fineline pens in different sizes, such as 0.1, 0.3, and 0.5 mm, so that you can vary line weight. Use hatching, cross-hatching, and stippling to show texture and shading rather than relying on colour. You could also add a grey or brown fineliner to your kit.
-
Fountain pens: As your drawing skills improve, consider using a refillable fountain pen with waterproof fountain pen ink. It's more economical in the long run, and the smooth glide of the nib helps you work in a more spontaneous way than with pencil or felt tips. Waterproof inks allow you to add watercolour washes over the top without smudging your lines.
-
Dip pens: These simple nibs allow a wider range of inks, but with sharper points require smoother papers and consistent dipping into the ink. Dip nibs are great for modern calligraphy, manga drawing and more organic looking marks, but not so portable for outdoor use.
-
Watercolour: This is definitely the most popular medium for urban sketching. It's portable, fast to use, and it's transparency is great for capturing light and atmosphere. It's made from finely ground pigment with gum arabic, which also adds an appealing luminosity to the finished work.
-
Mixing watercolour pigments: Start with a limited palette rather than a wide range of colours. Using mainly the primaries (red, blue, yellow) and with the help of a colour wheel, you will quickly learn how to harmoniously mix colour. A practical option for beginners is a small travel watercolour set with 6 to 12 colours. Look for the overall colour relationships in a scene instead of trying to match every colour exactly. Often it's one colour family that dominates. Use contrast to draw attention to your subject. Stronger colour, darker values, or a small pop of bright colour can draw the eye to the focal point of the sketch. Testing mixes first on a small scrap of paper or a mixing palette helps you identify what will work best.
-
Artist grade tubes: Professional watercolours contain more pigment and less filler, which gives stronger colour and better mixing. Many artists squeeze small amounts from tubes into a palette and let them dry, creating their own custom pan set. A common set up is a small metal palette with empty pans to fill with paint from artist grade tubes. It combines quality with portability.
-
Pans and half pans: For a complete beginner, preformed watercolour pans are very convenient. The pans fit into travel palettes and can be swapped or refilled when they run out. A practical set up is a 12 half-pan travel watercolour set with a folding mixing tray. Mist with water to activate the pigments just prior to starting your painting.
-
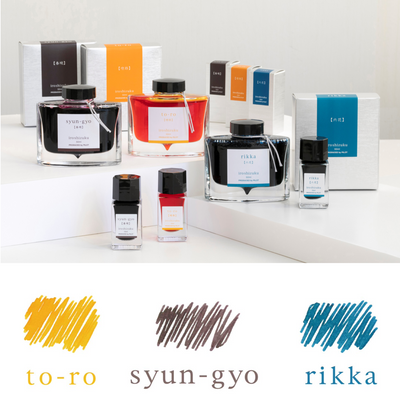
Liquid watercolour: For covering a large area with a wash, liquid watercolour is also available in bottles with an eye dropper for transferring the paint. As a general rule these diluted pigments are less resistant to fading, but can be fun to splash onto a work. If you're working in a sketchbook, once you close the sketchbook the risk of fade is reduced.
-
Watercolour pencils: Another option for simplicity is to use watercolour pencils. Again a small selection of 6-12 artist grade pencils, blended using a water brush, can produce just about any colour you need. A very portable option.
-
Recommended 12 colour palette: A balanced watercolour palette usually includes warm and cool versions of the primary colours, plus a few earth tones. A selection might include lemon yellow, hansa yellow medium, cadmium red or pyrrol red, alizarin crimson or quinacridone rose, ultramarine blue, cerulean blue, sap green, viridian, burnt sienna, raw sienna and a neutral tint or Payne’s grey. A helpful tip is to paint out a colour chart yourself, which shows how your palette mixes and helps you learn your colours quickly.
-
Watercolour brushes: You only need one or two good brushes to start. A quality round brush can create thin lines with the tip and broader strokes with the belly. Using different pressure and angles you can mark a wide range of marks. The best for a beginner is a round size 6 or 8 with a good point, made from sable or a modern synthetic mimic. A very portable option is a water brush, which has a less responsive point, but includes a small water reservoir in the handle. Another low cost option is a oriental hog hair brush on a long bamboo handle, intended for calligraphy, but offering the belly and point watercolour requires.
-
Water: Use distilled or tap water and carry it in a screw top bottle. On location, tip some into a second jar and you will have one for washing dirty brushes and one for mixing clean colours.
-
Watercolour paper: The surface you paint on makes a big difference with watercolour. Paper designed specifically for watercolour handles water better and prevents buckling or dulling of colours. For urban sketching, many people prefer watercolour sketchbooks because they keep drawings together and are easy to carry. Paper weight around 200 to 300gsm is usually strong enough for light washes without needing to stretch the paper. A practical tool for beginners is a small A5 or A6 watercolour sketchbook with cold-pressed paper. Cold pressed paper has a mid grain texture that helps washes and ink lines look lively while still being easy to draw on.
-
Watercolour techniques: Pen line is often placed first to define the drawing, then a thin translucent wash is used for backgrounds or to block out the larger shapes. Using dilute paint and a wide brush, quickly wash the paint over the paper in horizontal strokes. Let the white of the paper show through to create highlights rather than trying to cover the entire sheet. Once the wash is dry, use wet-on-dry for details, to create crisp edges and clear shapes. Perfect for architectural details, people and street furniture. Use wet-on-wet to enhance skies, infer shadows, or objects receding into the distance. Apply water first, then drop in colour, allowing it to blend for a soft, atmospheric effect. Experiment with lifting and layering. You can lift colour with a damp brush or kneadable eraser. Adding multiple layers of transparent wash gradually builds depth and richness. Other practical tools include masking fluid and a few sponges, which help control white areas and textures while still keeping it simple for outdoors.
-
Gouache: Similar to watercolour but more opaque, which makes it easier to cover mistakes and add highlights on top of dried layers. It is not nearly as popular as watercolour, but useful for sketchers who like a bolder, graphic style or want strong colour contrasts. A practical way to start is to carry a tube of white gouache and use it with a synthetic brush to add highlights over your watercolour work.
-
Oil paints: Rarely used for urban sketching because they require longer drying times, more equipment, and solvents. However, if you like the rich colour of oils, you could use oil based pastels just to capture quick impressions of a scene before finishing the details later.
-
Acrylics: Not very common in urban sketching, mainly because they dry too quickly and usually require more brushes, water, and mixing space than most sketchers want to carry. If you're interested in acrylics for the colour vibrancy and opacity, a practical option is to use acrylic paint markers. Many urban artists include a white or bright coloured Posca marker in their kit to add a quick pop of colour.
-
Pastels and chalk: Great for quick, expressive sketches of urban scenes, especially for capturing texture, light, and colour without fine detail. Use soft pastels for vibrant colour and chalk or pastel pencils for fine lines and details. They allow you to layer and blend directly on the paper using a blending stump or cotton swab. Pair them with toned or textured sketchbook paper, which helps the pastels adhere, adding depth and contrast.
-
Charcoal: Excellent for quick, bold sketches and capturing the structure and atmosphere of urban scenes. Its soft lines make it easy to create depth, shadows, and dramatic contrasts without worrying about colour. Charcoal pencils are the cleanest format for outdoor use and when combined with a kneadable eraser, can be used to lift highlights or correct mistakes.
-
Graphite pencil: The most versatile and portable drawing tool for urban sketching. It allows you to create precise lines, soft shading, and quick sketches, making it ideal for both beginners and experienced artists. It's available in wood cased pencils, mechanical pencils and clutch pencils, in a range of lead grades. Use HB for general drawing and B through to 6B for darker shadows and accents. A few graphite pencils, a soft eraser and a sharpener makes a compact kit to take anywhere.
-
Printmaking: Can add unique textures and repeated patterns to urban sketches, but it is less common as it requires more equipment. A practical tool instead is the use of pre-made stamps with an oil-based stamp pad (for permanence) or the use of plasticine to capture impressions of textures you encounter in the wild.
-
Mixed media: Lets you combine different materials such as pen, watercolour, gouache, pastels, or collage in a single urban sketch. This adds texture, depth, and visual interest, and is perfect for experimenting with your style. Start simple by pairing pen and watercolour, then gradually introduce other media like coloured pencils, gouache highlights, pastel accents or collage. Focus on layering and seeing how different materials interact rather than trying to perfect every technique.
-
Graphic design: Design tools and digital software can be a useful for laying out, enhancing, editing, and presenting your urban sketches. Rulers and templates aid scale, calligraphy pens create eye catching headings, a Chinagraph can write on plastic surfaces or be used as a resist, and tracing paper helps to transfer images and protect work. Choose the tool for the skill you're trying to foster.
Photographing your work and applying simple edits like cropping, contrast adjustment, or adding labels can be the final step to make your sketches more visually appealing. It's also allows you to share your stories more widely, while still keeping the feel of analog work, and hopefully inspires others to join the sketching community.